
Overview
Salesforce API integration enables seamless connectivity between Salesforce and other systems or applications. It provides various APIs such as REST, SOAP, Bulk, Streaming, and Metadata, catering to different integration needs. Developers can authenticate using OAuth or username-password mechanisms, and then can perform operations like querying, creating, updating, and deleting records, handling large data volumes, receiving real-time updates, and managing metadata. Salesforce offers SDKs and libraries for popular programming languages, simplifying the integration process and allowing for customized and efficient interactions.
Goals
- Salesforce API Integration aims to give developers thorough and understandable instructions on how to seamlessly integrate Salesforce with other applications or systems by utilizing a variety of APIs and authentication methods.
- It aims to empower developers to efficiently leverage the Salesforce API functionality, including data manipulation by offering detailed explanations, code examples, and best practices for successful integration.
How to Open a Free API Enabled Account?
To open a free Salesforce account with API access enabled:
- Visit the Salesforce website (https://developer.salesforce.com/signup).
- Signup for the free salesforce developer Edition account and follow the prompts to sign up for a free trial account.
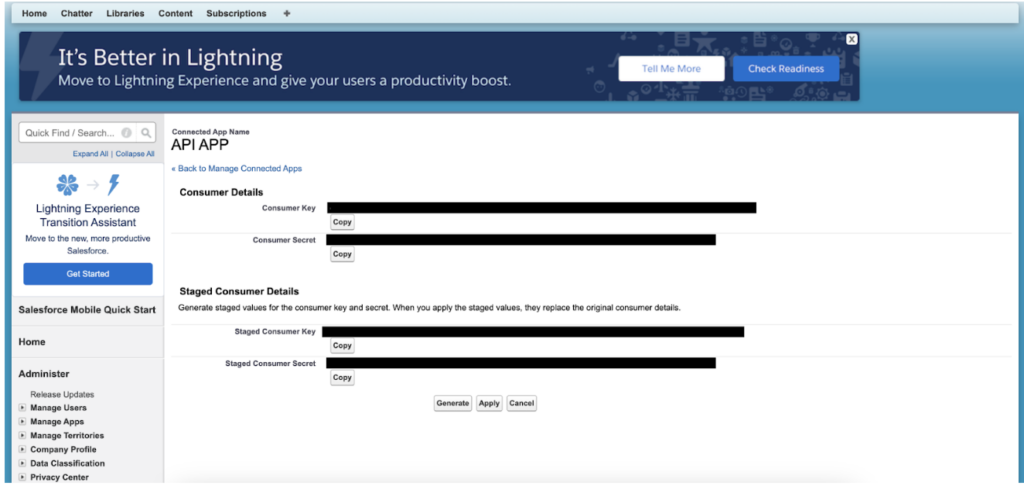
How to Get Consumer Key and Consumer secret?
To open a free Salesforce account with API access enabled:
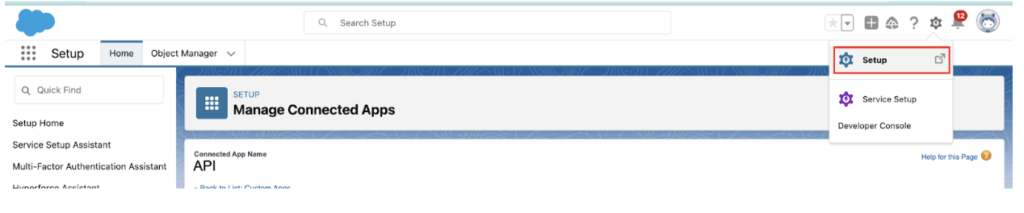
- 1. Navigate to the setup (marked in red).
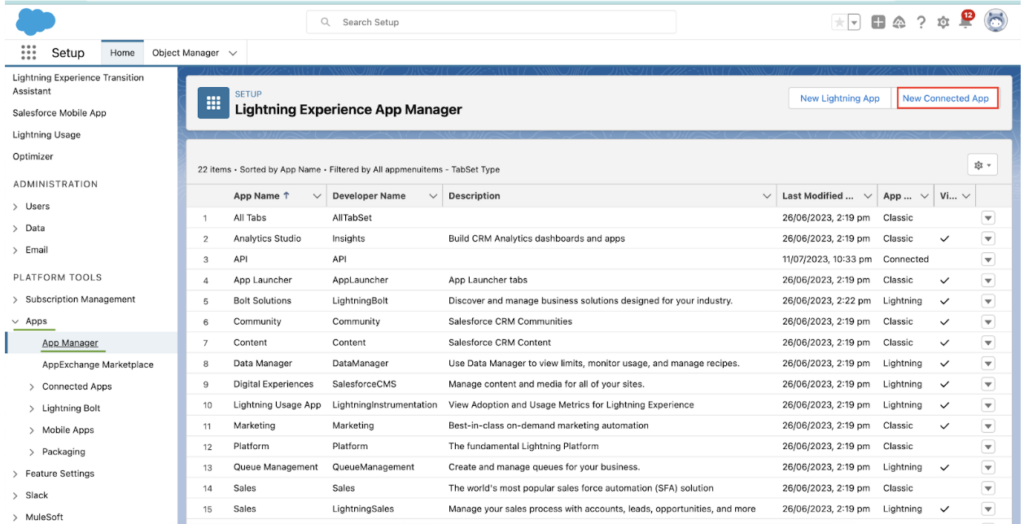
- 2. Navigate to Apps > App Manager
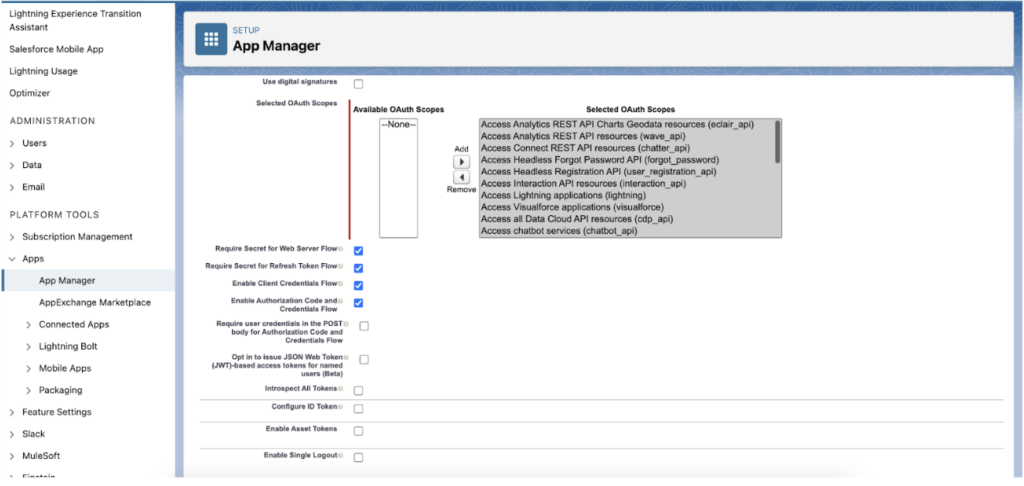
- 3. Enter Details

Note: If you don’t have a callback URL, use this : https://oauth.pstmn.io/v1/browser-callback

- 4. Click on Save
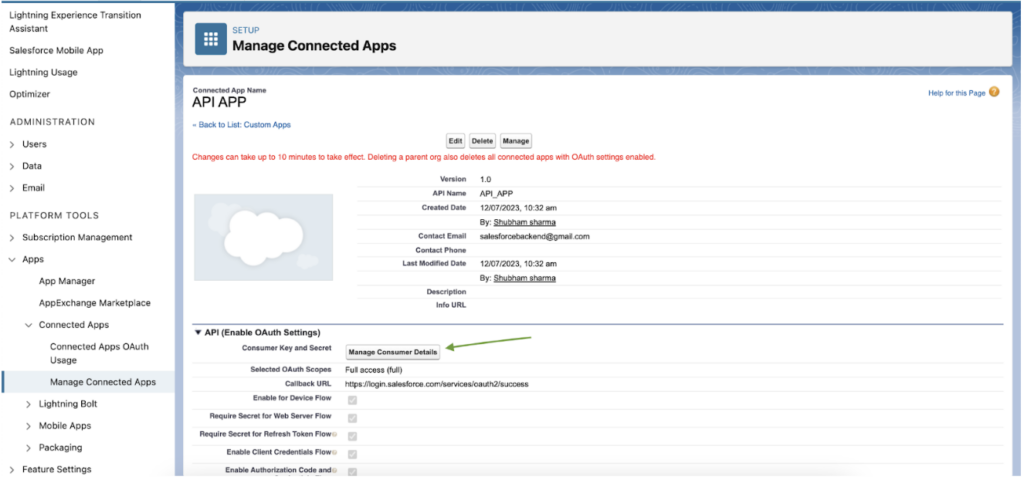
- 5.Navigate to ‘Manage Consumer Details’ and enter OTP received on email.
Salesforce REST API integration via JS Force?
When building applications that require Salesforce integration, there are many tools and technologies to choose from. In this guide, we’ll explore how to use the JS Force library to easily and efficiently integrate your application with Salesforce’s REST API.
What is JS Force?
JS Force is a JavaScript library for interfacing with Salesforce’s APIs. It provides a simple and easy-to-use interface for integrating your application with Salesforce data.
What features does JS Force offer?
JS Force supports authentication, querying, inserting, updating, and deleting of Salesforce data through the REST and SOAP APIs.
How does JS Force work?
JS Force uses the Salesforce JavaScript SDK to interact with Salesforce APIs and provide useful features.
Authentication with Salesforce using JS Force
What is Authentication?
Authentication allows your application to perform actions on behalf of a Salesforce user. JS Force provides multiple mechanisms to authenticate users in Salesforce.
How to authenticate with JS Force?
You can authenticate with Salesforce using various methods such as OAuth 2.0, Username-Password, and Session ID through JS Force’s Authentication APIs.
Reading data from Salesforce API with JS Force
Reading data from Salesforce is a crucial part of integrating your app with Salesforce, and JS Force provides powerful methods to do so. You can use SOQL (Salesforce Object Query Language) in JS Force to fetch data from Salesforce API. It allows you to retrieve records or fields from a Salesforce object.
How JSForce is Helpful for API Salesforce Integration in NodeJs?
A JavaScript framework called JSForce makes it easier to integrate the Salesforce API with Node.js. It offers a simple syntax for calling APIs, supports callbacks and promises for asynchronous activities, and manages session and authentication. Developers can quickly access and modify data, carry out bulk operations, interact with information, and effectively troubleshoot integration problems with JSForce. It simplifies the development process and makes Node.js applications’ seamless integration of the Salesforce API possible.
Getting started JSForce
Install JSForce package (reference: https://www.npmjs.com/package/jsforce)
npm i jsforceWhen you installed JSforce, you can import using require(‘jsforce’) in your Node.js application.
const jsforce = require('jsforce');
const conn = new jsforce.Connection();
Connection (Basic Auth)
const jsforce = require('jsforce');
const conn = new jsforce.Connection();
const username = 'your-salesforce-username';
const password = 'your-salesforce-password';
const securityToken = 'your-salesforce-security-token';

conn.login(username, password + securityToken, (err, userInfo) => {
  if (err) return console.error(err);
  console.log('Logged in successfully!', 'User ID:', userInfo.id, 'Org ID:', userInfo.organizationId);
});
Connection (OAuth)
const jsforce = require('jsforce');

// OAuth2 client information can be shared with multiple connections.
const oauth2 = new jsforce.OAuth2({
  // you can change loginUrl to connect to sandbox or prerelease env.
  // loginUrl: 'https://test.salesforce.com',
  clientId: '<your Salesforce OAuth2 client ID is here>',
  clientSecret: '<your Salesforce OAuth2 client secret is here>',
  redirectUri: '<callback URI is here>'
});

// Get authorization url and redirect to it.
app.get('/oauth2/auth', function(req, res) {
  res.redirect(oauth2.getAuthorizationUrl({ scope: 'api id web' }));
});
Your app receives a callback from Salesforce with an authorization code in the URL parameter following the approval of the authorisation request. To obtain an access token, enter the code at Connection#authorize(code).
Make sure the following Scope is included in the Connected App Perform Requests on Your Behalf at Any Time (refresh_token, offline_access) and refresh_token is included in the call to getAuthorizationUrl for the refresh token to be provided from Salesforce.
Access Token Request
app.get('/oauth2/callback', function(req, res) {
  var conn = new jsforce.Connection({ oauth2: oauth2 });
  var code = req.param('code');
  conn.authorize(code, function(err, userInfo) {
    if (err) {
      return console.error(err);
    }
    // Now you can get the access token, refresh token, and instance URL information.
    // Save them to establish a connection next time.
    console.log(“Access Token: ”, conn.accessToken);
    console.log(“Refresh Token: ”, conn.refreshToken);
    console.log(“Instance URL: ”, conn.instanceUrl);
    console.log("User ID: " + userInfo.id);
    console.log("Org ID: " + userInfo.organizationId);
    // ...
    res.send('success'); // or your desired response
  });
});
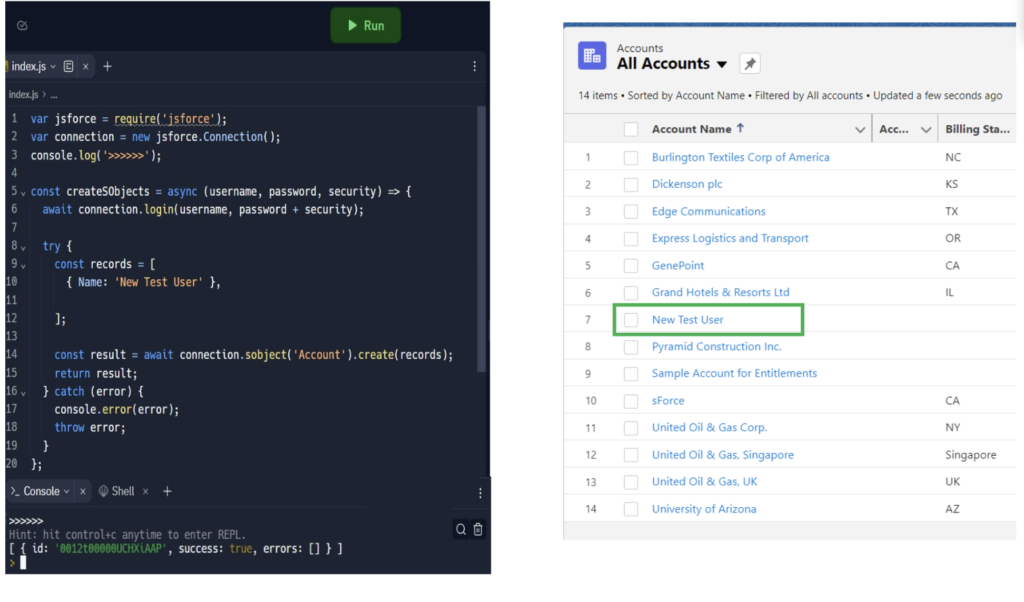
CRUD
Create
const jsforce = require('jsforce');

const conn = new jsforce.Connection({
  loginUrl: 'your-salesforce-login-url'
});

const { username, password, securityKey } = credentials;

conn.login(username, password+securityKey, function(err, userInfo) {
  if (err) {
    return console.error(err);
  }

  const fieldsToUpdate = [{ FieldName1: 'Value',FieldName2: 'Value'}];

  conn.sobject('ObjectName').create(fieldsToUpdate , function(err, result) {
return err ? err : result;
  });
});
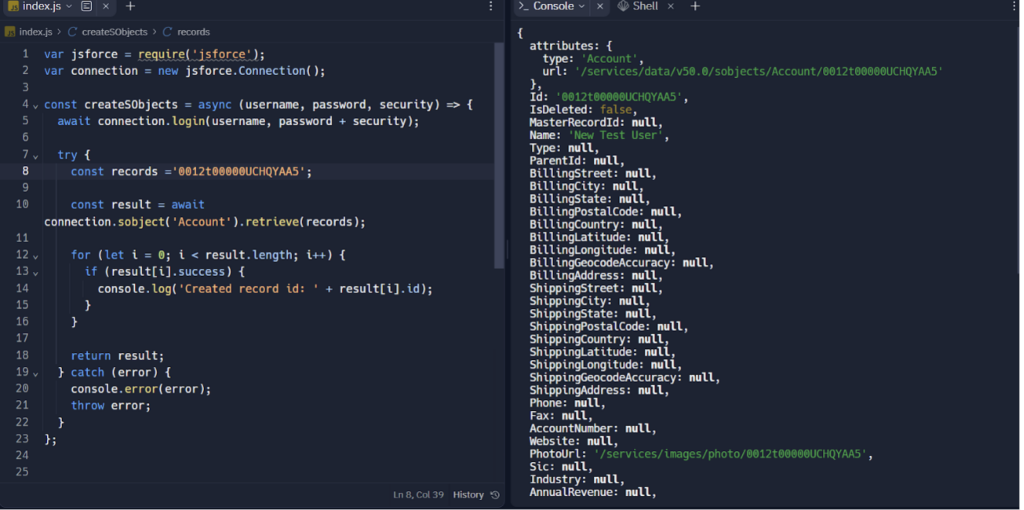
Retrieve
const jsforce = require('jsforce');

const conn = new jsforce.Connection({
  loginUrl: 'your-salesforce-login-url'
});

const { username, password, securityKey } = credentials;
const recordId = [‘recordId’]

conn.login(username, password+securityKey, function(err, userInfo) {
  if (err) {
    return console.error(err);

  conn.sobject('ObjectName').retrieve(recordId, function(err, record) {
	return err ? err : record;
     });
});
Update
const jsforce = require('jsforce');

const conn = new jsforce.Connection({
  loginUrl: 'your-salesforce-login-url'
});

const { username, password, securityKey } = credentials;

conn.login(username, password+securityKey, function(err, userInfo) {
  if (err) {
    return console.error(err);
  }

  const fieldsToUpdate = [ { Id: ‘id’ FieldName1: 'New Value 1',FieldName2: 'New Value 2'}];

  conn.sobject('ObjectName').update(fieldsToUpdate , function(err, result) {
return err ? err : result;
  });
});

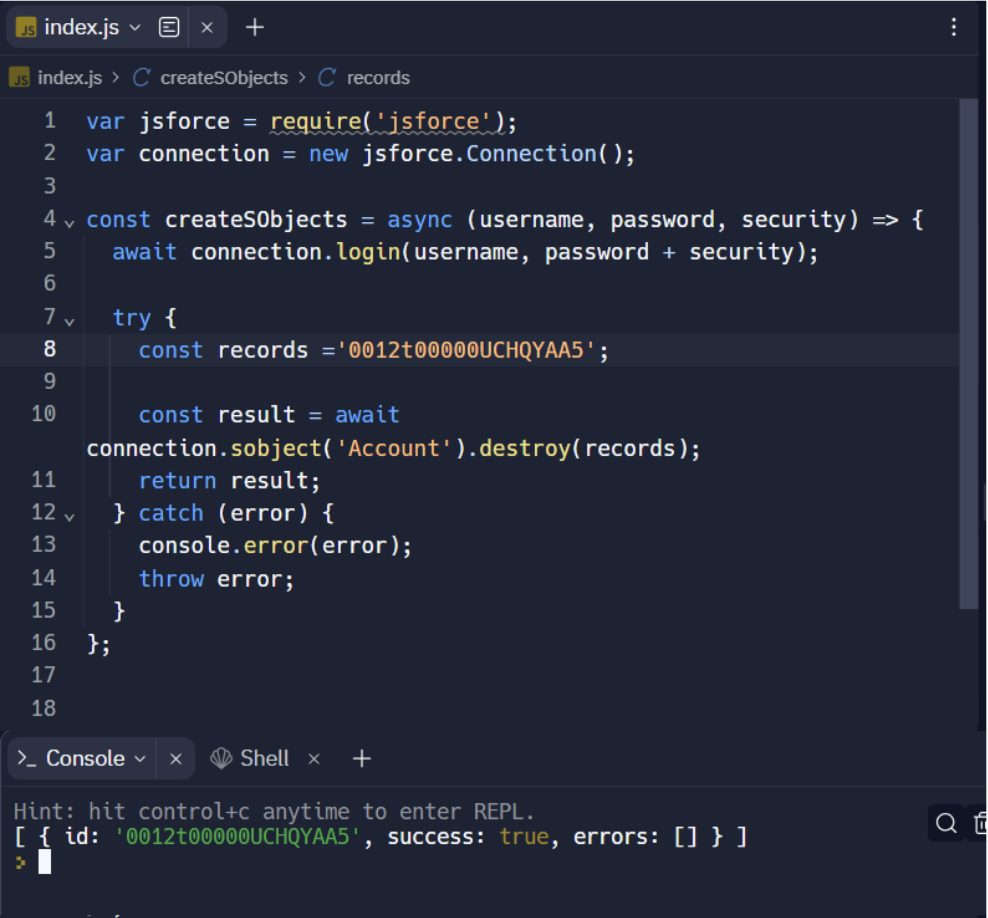
Delete
const jsforce = require('jsforce');

const conn = new jsforce.Connection({
  loginUrl: 'your-salesforce-login-url'
});

const { username, password, securityKey } = credentials;
const recordIds = ['recordId1', 'recordId2']

conn.login(username, password+securityKey, function(err, userInfo) {
  if (err) {
    return console.error(err);

  conn.sobject('ObjectName').destroy(recordIds, function(err, result) {
	return err ? err : result;
     });
});
Subscribe for More
Tava is released in phases as we develop our full suite. Subscribe for release updates.
Get Ready to #DisruptEverything
Tava is free to get started. Build your custom application today.